The Overall Composition
This image is based, in part, on an earlier work of mine, "Phantom of the Orca", which featured a similar space ship near a similar gas giant planet. I've taken this opportunity to rebuild the original models from scratch. The original ones wouldn't have looked good enough at this high a resolution. I started with the idea that I wanted to show the realization of an idea through the use of a computer. I decided that the way I could do that was to show the idea literally bursting free of the computer. Originally I envisaged a scene in which the right side of the monitor faded out and the spaceship became real. I eventually settled on the current scheme, where the computer has a wallpaper image that is identical to the space scene partially revealed in the right half of the picture.
In order to get things lined up correctly, I did a large rendering with just the LCD monitor's frame and the space scene in the picture. All the other office stuff was commented out. I then cropped the resulting image to just the portion within the borders of the screen. Next I used that image as wall paper on my computer, arranged things on the screen and used the print screen key to capture a screenshot to the clipboard. Next I went back into Paintshop Pro and inserted the captured image which I saved out as a Portable Network Graphics (PNG) file. I used that file in the image map for the LCD monitor's display.
Although it isn't obvious, I lit the two parts of the scene seperately by using light_groups. The light_group feature allows you to specify a set of objects and lights in a light group and the objects in that group will be illuminated only by those lights. A non-intuitive characteristic of light groups is that shadows are created by all the objects that are in the scene, regardless of whether or not the object is actually illuminated by the light source. I think the lighting would have worked a little better if I could have eliminated those cross-light_group shadows.
I also would have liked to use area lights to illuminate the office portion of the scene, but I simply ran out of time. My estimates showed that just doing the main image would have taken over a week using the computers available to me. If you include the 2 detail images as well, it would have taken closer to 3 weeks. Oh well.
As it was, each of the renderings took from eight to ten hours to run on our computers, which are Alienware Area-51 machines with Pentium 4 processors running at 3.0GHz, 2G of Ram, and an 800MHz FSB.
The Individual Models
Below I've written a little about most of the individual models that I created for this image.
Monitor
In order to create the raised letter logo for the monitor, I created an image in Paintshop Pro of the text I wanted. After saving that version I created a copy that was black and white only. That second image is what I used for the basis of a heightfield on which I placed an image map using the first image. (I also used waterline to get rid of the background part of the height field.) The resulting object became my logo for the monitor.
Coffee Mug
The coffee cup uses the Rounded_Cylinder from the shapes.inc file. The handle is made from a sphere_sweep. The steam is created using scattering media with two intersecting density statements.
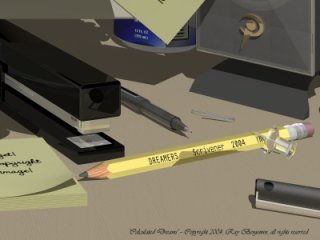
Pen
The pen is modeled after the pen I've been using to make notes and sketches. The only part of the construction that was difficult was the clip for the top of the pen. I tried several approaches but finally settled on building it out of boxes and cylinders carefully pieced together.
Paper Clip
The paper clips were pretty easy. They were constructed from tori and cylinders. The bent paper clip simply adds a few more cuts and angles to the model.
Thumb Tack
The thumb tacks turned out to be surprisingly complicated to create, especially since they are designed to be seen close up. The plastic portion is made up of two cylinders, two cones, and two tori united in a merge structure. I take a difference between that and a cylinder to create the hole for the spike and then a cylinder plus a cone provide the metal tip of the thumb tack. I created the hole for the spike so that the clear version of the thumb tack would look right.
Speakers
The speakers were models I adapted from another image that I did for a column I was writing. The partially transparent front cover has a quilt normal that gives it an interesting look. The original design for the speaker was pretty boxy and boring, so at a friend's recommendation, I completely remodeled the case and made some modifications to the speaker underneath the cover. Finally I added the POV-Ray logo.
Cubicle Wall
The cubicle divider wall was an interesting challenge. I wanted to create something that would match the texture of a real cubicle wall. The type of cubicle wall I was after was one in which it appears that the cloth is made up of a coarse weave of flat groups of threads. I used a Mesh object to create the underlying model of the coarse weave. I then used two gradients in a checker pattern to simulate the threads within the coarse weave. Originally I scaled the resulting pigment down and translated it until it matched up with the original mesh. The effect was very pleasing.
Pop Can
The Pop Can contains Dream Cola, a wonderfully refreshing liquid that contains no calories at all. The can is made up of the usual suspects and covered by an image_map created in Paintshop Pro. I would have liked to add condensation and dents to the cans. I simply couldn't find a good technique for doing the condensation in any reasonable amount of time. I also lacked a good triangle mesh modeller to use to create deformed cans.
Web Cam
The Web Camera is modeled after several that have been around for a long time. The outer shell is made up of two hollow shells, one inside the other with a gap between the halves of the outermost shell. This makes for a realistic seam. The lens portion is made up of a cylinder with several nested cylinders subtracted from it. The lens in the middle is a flattened sphere with a glass material. Finally, I created the lens cover by creating a shell an cutting the desired shape from it and slightly flattening it along the x-axis.
Stucco
The wall texture is a stucco heightfield that I borrowed from the stucco example that comes with the standard POV-Ray release.
The Drawing
The drawing on the desk is one of the drawings that I made when designing the space tug.
Saturn
The texture for Saturn is basically a very fine gradient that was built using colors picked from a photo of Saturn taken by the latest probe. The rings are created using planes intersecting with cylinders. The texture is an onion gradient mix that should probably be scattering media.
Pencil
The pencil was an interesting challenge. The basic shape isn't difficult, it's a hexagonal paint shell with a wood hexagon inside that and a cylinder of pencil lead at the center. One end is "sharpened" as I'll explain below. The other end has a metal crimp holding on a pink eraser.
Getting it "sharpened" so that it looked realistic was baffling me. My wife came up with the technique I used. I use a difference of the pencil and an object made up of planes that are rotated at varying angles around the X-axis. (The pencil object is created with it's long axis along the X-axis.) Each plane is rotated along the Z-axis by a set amount plus a few degrees plus or minus, then it's rotated around the Y-axis a set amount plus or minus a few degrees until there are planes all around the circumference of the pencil. A final plane that clipped off the too sharp tip made the pencil look like it might have been used once or twice. It still wasn't quite right, though. I finally clipped a bit off the original "lead" and replaced it with a sphere, so that it looks as if the sharpened pencil has been written with a bit, wearing down the sharpened point.
The eraser assembly was the next to last part I worked on. The metal crimp also turned out to be fairly involved. It's constructed from a cylinder, four tori, and a bunch of cylinder cutouts rotated around the X-axis. The eraser itself is a Rounded Cylinder, from shapes.inc. It's an easier object to use than a quadradtic object. The texture is just pink with some gray added in a bozo pattern to simulate the smudges you see on erasers. In the future I'd like to make a better eraser, perhaps out of blobs, that can show more use.
I discovered a problem with POV-Ray while working on the pencil. I found that if I put the pencil itself inside a light_group, the cutaway portion of the sharpened end no longer displays a texture, it is just black. That created a challenge since I wanted to put the pencil in the same light_group as the rest of the desktop objects. I finally set up the pencil and a light for it as global objects to get the desired result.
SpaceShip
The space ship, as I said before, is based on an idea I originally used in another image. It's rebuilt from scratch with considerable changes here. My idea for the ship started with physics. It's far easier to find materials with great tensile strength than it is to find materials with great compression strength. Thus a cable can be smaller than a girder that bears the same load. Someday, if we don't screw up too badly, the human race will be settling this solar system and eventually others. When that happens, there will be cargo to be moved, just like there is in any civilization. Because it's easier to pull a load on a cable than to push it, I thought that perhaps a space ship designed to work like a frieght train might be how things get moved around in the future.
The Spaceship's Ring
The ring design of the ship provide several benefits. It allows me to mount four large engines at a distance from the cargo containers so that the exhaust would not hit them. (During acceleration, a long cable would extend in back of the ship connecting to the cargo train so that the train is not damaged by the exhaust.) By mounting four engines on the torus, it becomes very maneuverable. It can turn in any direction simply by varying the thrust from the engines. This eliminates complicated gimbaling apparatus. The aerospike design of the engine outlets helps control the exhaust gases, confining them to a much narrower cone than conventional nozzles would.
Within the main torus, a second torus rotates, providing some artificial gravity for the crew. The main torus does not rotate so that there is a stable platform for the engines, communications, and the command bubble, that is located on the inner side of the ring on the forward edge. Two transition "lifts" run on rings on either side of the rotating section. They provide a way for crew members and cargo to be accelerated up to the speed of the ring or decelerated back down to a stop. The water tanks, which provide all the water needed by the crew and machinery for the duration of the voyage, are set in the outer shell where the water they hold provides additional radiation shielding for the crew.
Four main airlocks are located at 90 degree intervals around the circumference of the ring. These provide convenient access for the crew to communications and other gear that are mounted on the hull. They also provide docking points for stations and crew/supply transfer vehicles.
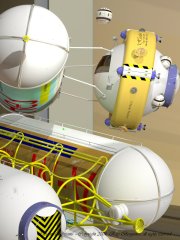
The Central "Egg"
The large central ovid section provides fuel storage and room for additional equpment. It also provides a hanger for two tugs which are used to perform maintenance on the cargo train and to move cargo canisters.
The Cargo
There are two basic "cars" for this interplanetary train: the quad carrier and the bulk cargo module. The quad carrier, as it's name implies, carries up to four seperate cargo modules. Variations of the basic module design carry pressurized liquids and gasses, mail, parcels, ores, or any other cargo. The bulk modules are used primarily for transporting large quanitities of liquid and gas raw materials. The modules that carry goods that need a pressurized atmosphere have a docking ring and airlock so they can be attached directly to a space station for unloading.
The models of the cargo containers are pretty simple, cylinders and spheres. I added rails on either side of the cargo modules so they could be manipulated by the tugs. I have a macro that creates the running lights for the modules and for the quad carrier itself. The quad carrier is constructed from cylinders and tori. I used differences to clip the tori that make up the rails where the containers rest and applied a different texture so it would look as if there had been wear and tear. I also added a drum and motor to one end of the quad carrier. The drum is used to hold cable that actually links the train together. This way the distance between cargo modules can be controlled in order to minimize the chance of accidents during maneuvers.
The texture I used for the cargo is an image_map based texture layered with two others that gives the impression of wear and tear.
The Tug
The tug can be seen most clearly in one of the detail views. It's in the process of loading or unloading the cargo module. Four arms are used to manipulate cargo. The ring around the tug contains the four powerful engines that are capable of hauling small trains of cargo modules for short distances. The ring design is copied from the original space ship since it provides the same advantages here: mechanical simplicity and reliability. Each engine on the tug also contains reaction control thrusters, elements of the reaction control system which keeps the tug oriented correctly. On the front of the tug you'll find three spotlights which are used for illuminating the work area. If additional lights are needed, the tug can use one or more of the 4 Remote Observation And Maintenance (R.O.A.M.) craft that it carries in four docking ports on the rear half of the ship.
Each R.O.A.M. craft is equipped with it's own propulsion system, cameras, and a large forward spotlight. Some models also include small arms which can do delicate maintenance work. The R.O.A.M. craft also include four large handles which can be used as hand holds by astronauts working with the devices. Each one carries an emergency inflatable "beachball" which can be used to rescue people in emergencies. The rescue equipment is accessable via the maintenance hatch in the back of the craft. I used a gradient texture overlaying a silver texture to give the nozzles on the primary engines the appearence of some use.
There is a large docking collar with an airlock on the back of the tug. This is where the tug docks with the space station and with other space craft.
The tug carries four dish antennae and four laser communication tranceivers for communication.